
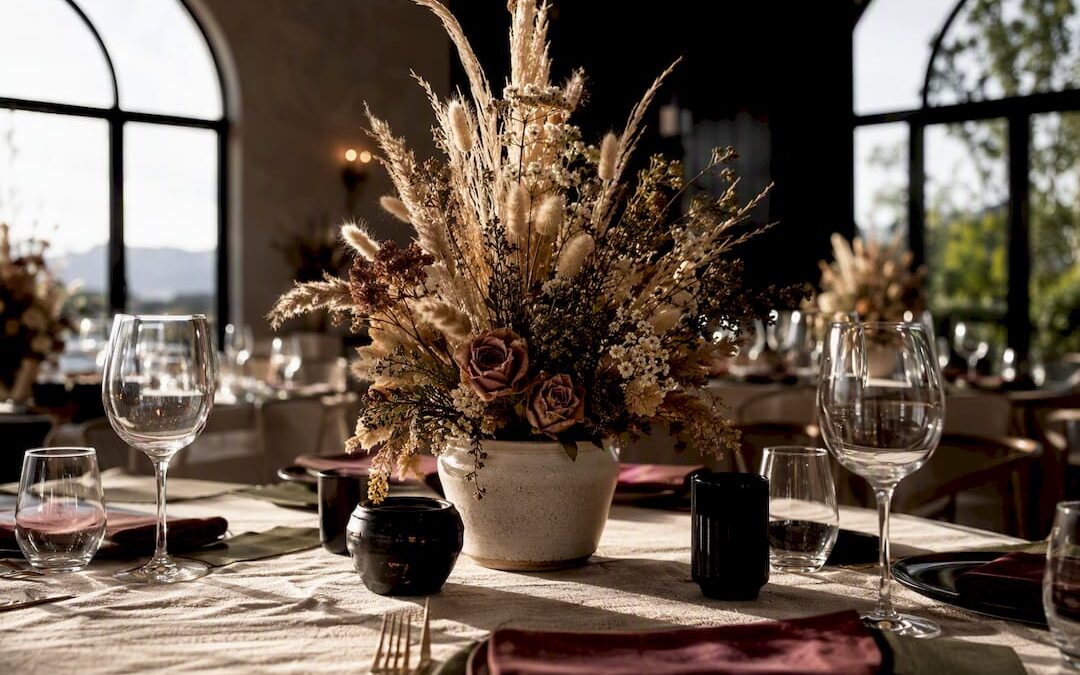
Yes, DIY wedding decor is worth it when you pick forgiving projects and start early. Dried-flower centrepieces, candle clusters, paper or ribbon backdrops, hand-lettered signage and simple favours give the biggest visual return for the least skill. Steer clear of anything structural, electrical or reliant on same-day precision. Venue rules on flames and rigging matter more than most couples expect.
TL;DR:
- DIY wedding decor is most cost-effective and stress-free when focusing on forgiving projects like dried flowers, candles, paper backdrops, and signage, which can be completed weeks in advance.
- Small-scale tabletop arrangements such as dried-flower clusters, candle groupings, or mismatched bud vases offer high visual impact and are relatively inexpensive to produce yourself.
- Structural elements like arches, rigging, or complex lighting should be hired professionally, especially if involving permanent fixtures, ceiling rigging, or open flames, to avoid safety risks and last-minute failures.
- Proper planning includes sourcing materials early from wholesale markets or online bulk suppliers, spreading work across months, and testing all elements before the wedding day to prevent last-minute mishaps.
- For larger or destination weddings with more complex setups, hiring a professional planner or on-day coordinator ensures a polished look and reduces the risk of logistical chaos.
Table of Contents
- What are the easiest high-impact DIY wedding decorations?
- DIY centrepieces and tabletop decor that photograph beautifully
- Backdrops, arches and photo walls without power tools
- Signage, stationery and place settings you can make at home
- Lighting and candles: the safest ways to transform a room yourself
- Favours and keepsakes that feel personal without the price tag
- Where to source materials without overspending
- A realistic timeline for making and assembling your decor
- Budget guide: what DIY really saves against hiring
- Planner’s brief: making DIY look luxe and knowing when to call in help
- Table settings and place cards that tie the whole look together
- Budget versus hire: where the real savings and real risks sit
- Step-by-step: building a dried-flower centrepiece from scratch
- Matching your DIY decor to your wedding’s overall style
- Eco-friendly and sustainable DIY decoration ideas
- Common mistakes that undo an otherwise good DIY plan
- Storage and transportation before the big day
- A planner’s honest note on where DIY fits
- An honest alternative: when it makes sense to bring in Winelands Function
- Sources
What are the easiest high-impact DIY wedding decorations?
Start with the projects that reward effort without punishing mistakes. Each of these can be built weeks ahead, stored flat or boxed, and still look considered on the day.
- Dried-flower centrepieces — no water, no wilting, made a month early. Materials: dried pampas, bunny tails, statice; Difficulty: easy.
- Candle clusters — instant ambience for the cost of wax. Materials: pillar candles, mirror plates, greenery offcuts. Difficulty: easy.
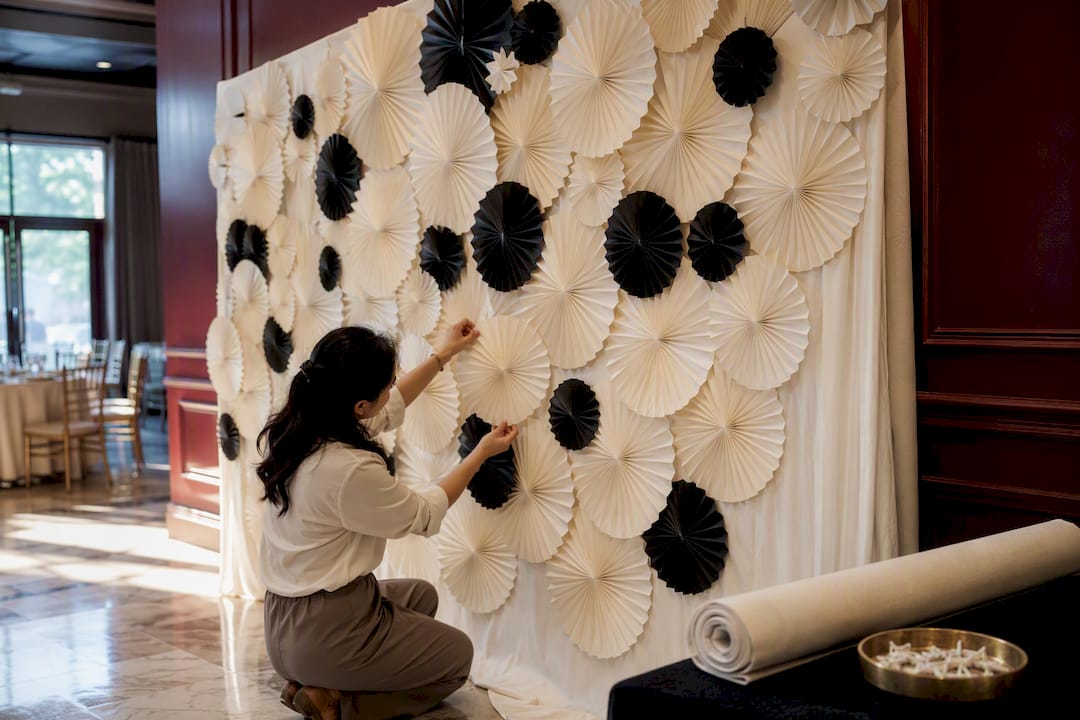
- Paper fan backdrop — a full photo wall for under $20 using 30 to 40 folded paper fans. Difficulty: easy to moderate.
- Welcome sign — printed, chalkboard or hand-painted, depending on your confidence. Materials: A2 board, vinyl lettering or paint. Difficulty: easy.
- Ribbon or tulle dowel backdrop — soft texture behind a ceremony arch or top table. Materials: dowels, ribbon rolls, fishing line. Difficulty: easy.
- Seed-packet or jam-jar favours — meaningful, cheap, and bought in bulk ahead of time. Difficulty: easy.
Each of these earns its place because it’s cheap, photographs well, and doesn’t collapse under time pressure. Save your energy (and your Sunday afternoons) for these six before you attempt anything trickier.
DIY centrepieces and tabletop decor that photograph beautifully
Centrepieces set the tone of every table photo, so this is where DIY effort pays off fastest. Three approaches cover most styles and budgets.
Dried-flower clusters use 8 to 12 stems per vase, mixing pampas grass, bunny tails, statice and a few dried roses for colour. Because dried arrangements need no water and can be assembled weeks in advance, they’re the safest starting point for a first-time DIY bride. Expect £15 to £25 per table in materials, against £45 to £80 for a florist-built equivalent.
Candle clusters work on mirror plates or slate boards: group three pillar candles of varying heights with foliage tucked around the base. Always use enclosed hurricane vases if the venue allows open flame, and confirm the venue’s flame policy before you buy a single taper.
Mismatched bud vases suit a relaxed, garden-party look. Use five to seven small vases per table, one or two stems each, mixing textures like ranunculus, eucalyptus and a single dried accent.
- Dried clusters: easy, £15 to £25 per table
- Candle clusters: easy, £10 to £20 per table
- Bud vase runs: moderate, £20 to £35 per table
Pro Tip: Photograph one finished sample table under the lighting you’ll actually use on the day, not daylight from your kitchen window. Candlelight changes colour dramatically, and what looks warm at 2pm can look muddy at 8pm.
Backdrops, arches and photo walls without power tools
A striking backdrop does more visual heavy lifting than almost any other single element, and none of the best versions need a drill.
Paper fan walls scale beautifully: mix A5, A4 and A3 paper sizes for depth, and 30 to 40 fans in a mixed palette will cover a standard photo backdrop for under $20 in paper alone. Pin or glue them to a fabric sheet you can roll and transport flat.
Ribbon and tulle dowel backdrops hang from a simple frame or existing structure. Mix three or four ribbon widths and two fabric types (satin and tulle together adds movement) for a look that reads as more considered than a single-material curtain.
Pampas and dried-grass arch accents work best asymmetrical rather than symmetrical. Anchor two or three heavy stems at one side of the arch and let smaller sprigs trail across, rather than mirroring both sides.
- Paper fans: easy, under £20 total
- Ribbon dowel backdrop: easy, £30 to £50
- Dried-grass arch dressing: moderate, £40 to £70
Hire a professional the moment a build involves suspended weight, ceiling rigging or anything near an open flame source. That’s where DIY savings evaporate fast if something fails.
Signage, stationery and place settings you can make at home
Paper goods are the most forgiving DIY category because mistakes cost a sheet of card, not a bouquet of flowers.
A three-tier approach works for welcome signs depending on your skill and time: a printed vinyl decal on board is fastest and cheapest, a chalkboard with a paint pen sits in the middle, and full hand-lettering gives the most personal (and most time-intensive) result. Menus and place cards benefit from a cohesive kit: pick one washi tape pattern, one font, one card stock, and repeat it across every paper element so the table reads as designed rather than assembled.
Use free templates from Canva or a local print shop’s own design tool rather than building layouts from scratch, and always order one physical proof before printing the full run.
- Welcome sign: £15 to £60 depending on method
- Menus and place cards (100 guests): £25 to £45
- Seating chart: £10 to £30
Lighting and candles: the safest ways to transform a room yourself
Lighting and floral installations carry the most visual weight of any decor category, which means getting lighting right matters as much as centrepieces or signage, sometimes more.
String-light canopies transform a marquee or barn instantly. Battery-powered sets are safer and more flexible for outdoor venues without accessible power points, while mains-powered sets give steadier brightness for a full evening. Either way, test the full run for at least two hours before the day; cheap sets fail more often under sustained load than a quick test reveals.
Candle clusters and enclosed votives suit tables and aisles, but every venue has its own flame policy, and many heritage or marquee venues ban open flame outright.
- Confirm the venue’s flame policy in writing before buying candles
- Use enclosed glass holders, never bare tapers, near fabric or foliage
- Battery LEDs for anywhere near drapes, paper décor or dry florals
- Test all string lights fully assembled, not just per strand
Pro Tip: Flameless LED candles have improved enormously; the better battery-operated versions now flicker convincingly and cost a fraction of the insurance headache a real flame can create indoors.
Favours and keepsakes that feel personal without the price tag
Favours are where couples most often overspend on things guests forget by the following morning. Keep it simple and buy in bulk.
Seed-packet favours and mini jam jars typically cost under £1 to £2 each when ordered in bulk, and both feel more considered than generic sweets. Terracotta mini pots with a single succulent cutting work similarly well and can be assembled over several evenings rather than one exhausting weekend.
- Seed packets: £0.60 to £1.20 each, buy 10 to 15% extra for breakage
- Jam jars with honey or preserve: £1 to £2 each
- Mini terracotta pots: £1.50 to £3 each including the plant
Store finished favours in their original flat-pack boxes until the week of the wedding, and label each box by table number as you pack, not on the day itself.
Where to source materials without overspending
Sourcing well is half the saving. Retail flower shops mark up significantly against wholesale, so visiting a wholesale flower market early in the morning and buying 20 to 30% extra stems covers wastage and trimming without a second trip.
For paper goods and craft supplies, order card stock and ribbon online in bulk rather than buying small packs from a craft chain; the per-unit saving is substantial once you’re past 50 units. Save specialist tools, vases and props for thrift shops, Facebook Marketplace or short-term rental, since buying 40 vases outright for one day rarely makes sense.
- Wholesale flower market: best for fresh stems, go early, buy extra
- Online bulk orders: best for ribbon, card stock, fairy lights
- Thrift or rental: best for vases, lanterns, one-off props
- Craft chains: best for small tools and adhesives only
A realistic timeline for making and assembling your decor
Spreading the workload avoids the panic-build that ruins most DIY weddings. Work backwards from the date.
- 3 to 6 months out: choose your projects, order anything non-perishable (dried flowers, ribbon, signage boards, jars).
- 1 to 3 months out: batch-produce paper goods, dried arrangements and favours over several sittings, not one weekend.
- 2 to 7 days out: condition fresh florals if you’re using any, and do a full trial layout of one table.
- Wedding morning: hand placement to a delegated friend, planner or decor checklist so nobody is gluing fans to a wall an hour before guests arrive.
Build order matters as much as timing: structures go up first, florals and soft elements follow, and lighting is one of the last layers added, with one person owning the final walk-through before doors open.
Budget guide: what DIY really saves against hiring
The honest range: a full DIY décor setup typically runs $800 to $2,000 in materials, against $3,500 to $10,000 or more for a fully hired, professionally designed package, and the trade-off is 20 to 40 hours of your own labour across the months before the wedding.
DIY saves the most on paper goods, favours, and dried centrepieces, where materials are cheap and mistakes are low-stakes. Hiring tends to win on structural builds, large florals that need same-day conditioning, and anything involving rigging or complex lighting circuits.
- Paper goods and signage: DIY saves 70 to 80% versus hired print design
- Favours: DIY saves roughly 60 to 75% against branded favour suppliers
- Structural arches and rigging: hiring often costs less than a failed DIY attempt
Planner’s brief: making DIY look luxe and knowing when to call in help
The gap between “homemade” and “styled” usually comes down to three things: fabric choice over paper where you can afford it, one consistent colour palette across every element, and layered lighting rather than a single source. Winelands Function sees this constantly with hybrid weddings.
Bring in a day-of coordinator or supplier manager once your guest list passes roughly 100, once you’re juggling more than three DIY categories, or once any structural build enters the plan. Our wedding decor checklist is a useful starting point either way.
Table settings and place cards that tie the whole look together
Table settings are where small, consistent choices compound into a polished result. The napkin fold, the place card style, and the charger plate all need to speak the same visual language, or the table looks assembled rather than designed.
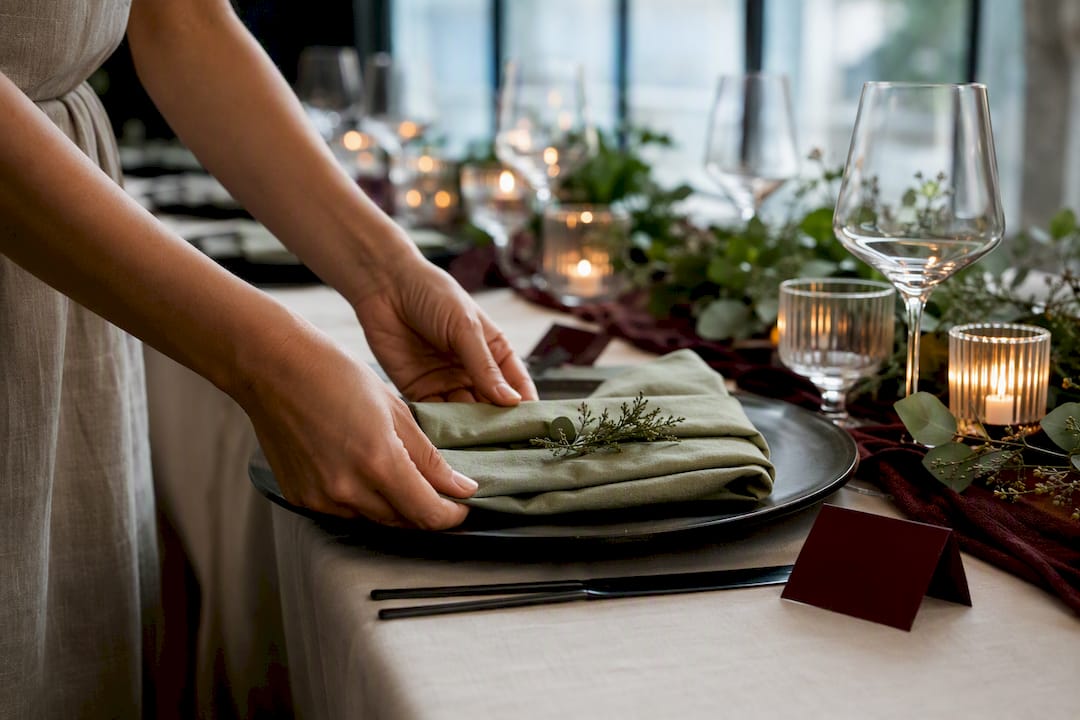
Pick one place card format and repeat it exactly across every seat: printed calligraphy on kraft card, a wax-sealed tag, or a simple leaf with a name painted on. Mixing formats table to table is one of the fastest ways to make a DIY reception look unfinished.
Layer your setting in three parts: the base (charger plate or placemat, if you’re using one), the centre (napkin, cutlery, place card), and the accent (a single sprig of dried foliage or a name tag tied with ribbon). Keep the accent consistent across every place setting, even if the centrepiece varies table to table.
- Place cards: one format, one font, printed or hand-lettered, never mixed
- Napkins: fold style chosen once and used at every seat
- Charger plates: optional, but if used at one table, use at all
- Menu cards: match the place card stock and colour exactly
For a cohesive tablescape, our wedding table decorations guide covers styling and supplier notes in more depth, and pairs well with small edible touches; the festive meal presentation ideas from Wild Foodz are worth a look if you want the food itself to double as tabletop decor.
Budget versus hire: where the real savings and real risks sit
The maths favours DIY on almost every small, repeatable item and favours hiring on anything that needs to work perfectly once, under time pressure, with no second attempt.
Dried centrepieces, paper backdrops, favours and signage are low-risk because a mistake costs you a sheet of card or a few stems, not the whole display. Structural arches, complex lighting circuits and large fresh-floral installations are high-risk because a failure on the morning of the wedding can’t be fixed by 4pm.
A useful rule: if the project can be tested a week early and stored until the day, DIY it. If it has to be built and to work correctly on-site within a few hours, weigh hiring seriously. Couples who ignore this distinction are usually the ones calling a florist in a panic two days before the wedding.
Hybrid budgeting works well in practice: DIY the tabletop, favours and paper goods, and hire out anything structural or electrical. That split typically keeps total decor spend well below a fully hired package while removing the single biggest source of day-before stress.
Step-by-step: building a dried-flower centrepiece from scratch
This is the project most couples start with, and it’s worth walking through in full.
First, buy your stems 4 to 6 weeks ahead, choosing pampas grass, bunny tails, statice, and one or two dried focal flowers like roses or protea. Second, trim each stem to roughly 1.5 times the height of your vase, cutting at an angle. Third, build from the outside in: place your tallest, airiest stems (pampas) around the vase’s edge first, then fill toward the centre with mid-height texture (statice, bunny tails), finishing with your focal flower slightly forward of centre.
Fourth, turn the vase slowly as you work to check it looks balanced from every angle, since guests will see it from all sides. Fifth, once built, store the arrangement upright in a box lined with tissue paper, away from direct sunlight, until the week of the wedding.
- Materials per table: 8 to 12 stems, one vase, floral tape
- Time per arrangement: 15 to 25 minutes once you’ve practised on one
- Storage: upright, dark, dry, undisturbed until delivery day
Matching your DIY decor to your wedding’s overall style
DIY only looks intentional when every element points toward one theme. Pick your style first, then choose projects that naturally suit it, rather than falling for a Pinterest idea that clashes with everything else.
A rustic or barn wedding suits dried grasses, kraft paper, and warm string lighting. A coastal or garden wedding suits pastel bud vases, driftwood accents, and airy tulle backdrops. A modern minimalist wedding suits monochrome candle clusters, clean typography signage, and very little clutter on the table.
Whatever the theme, choose one palette of three colours maximum and apply it across flowers, ribbon, paper and favours. A backdrop in blush and sage looks deliberate; a backdrop in blush, sage, gold and lavender looks like leftover craft supplies.
- Rustic: kraft paper, dried grasses, warm-toned string lights
- Coastal or garden: pastel bud vases, driftwood, tulle
- Minimalist: monochrome candles, clean typography, negative space
- Boho: mixed textures, macramé accents, layered rugs underfoot
Eco-friendly and sustainable DIY decoration ideas
Sustainable decor and budget decor overlap more than most couples realise, because reusing and renting is usually the cheaper route anyway.
Dried flowers are inherently more sustainable than fresh, since they involve no daily water use and can be kept, gifted or reused afterwards rather than binned the next morning. Choose potted plants over cut flowers where possible; guests can take them home, and you avoid the waste of a single-use bouquet entirely.
For paper elements, use recycled or FSC-certified card stock, and skip laminating anything you don’t need to keep permanently. Favours in reusable containers (small jars, fabric pouches, seed packets that guests actually plant) generate far less landfill waste than plastic-wrapped sweets.
- Choose dried or potted over cut fresh flowers where the look allows
- Use recycled card stock for signage and menus
- Rent vases, lanterns and props rather than buying single-use
- Favour seed packets or plantable items over disposable trinkets
Common mistakes that undo an otherwise good DIY plan
Most DIY disasters trace back to timing, not talent. Leaving every project until the final fortnight is the single biggest cause of a stressed, unfinished-looking wedding.
Underestimating quantities is the second most common error: couples often order exactly enough stems or fans for one perfect run-through, with nothing spare for breakage, trimming waste or a last-minute table addition.
Ignoring venue rules is the third trap. Turning up with open-flame candles to a venue that bans them, or a heavy arch to a marquee with no rigging points, wastes money and creates last-minute scrambling that no amount of enthusiasm fixes.
- Starting too late: spread projects across months, not the final week
- Under-ordering materials: always buy 20 to 30% extra
- Skipping the venue’s rules: confirm flame, rigging and access policies early
- No mock-up: build one full table or panel before committing to the whole run
- No delegation plan: decide who places everything on the morning itself
Storage and transportation before the big day
Decor that survives storage and transport well is decor that still looks good on the day; this is the part most guides skip entirely.
Store dried arrangements upright in boxes lined with tissue paper, kept away from direct sunlight and damp, since both fade colour and encourage mould. Flat-pack paper items (fans, signage, place cards) in their original boxes or between stiff card sheets to stop bending or curling in transit.
Transport candles and glass items in a padded box with dividers, and always transport centrepieces upright in a vehicle with enough floor space, never stacked in a boot. Label every box by table number or category before the week of the wedding, so whoever is setting up doesn’t need to guess.
- Dried florals: upright, dark, dry, tissue-lined boxes
- Paper goods: flat, between card sheets, no direct sunlight
- Candles and glass: padded dividers, transported upright
- Everything: labelled by table or area, packed by the person who’ll unpack it
A planner’s honest note on where DIY fits
A couple we’d consider a classic hybrid case handled their own centrepieces, favours and signage, then handed the marquee lighting, arch and on-day placement to a coordinator. It worked because they knew their limits early rather than discovering them on the morning of the wedding.
As a rule of thumb, once guest numbers pass 100 or the build includes anything structural, delegate. Mock up one table properly before committing to forty, and let someone else carry the folder on the day.
— Coert
An honest alternative: when it makes sense to bring in Winelands Function
DIY covers paper goods, favours and tabletop styling brilliantly. Where it gets harder is a destination wedding, a guest list over 150, or any install involving rigging, lighting circuits or multiple suppliers arriving on one tight timeline. That’s the point where hours saved on Pinterest tutorials get eaten by logistics nobody warned you about.

Winelands Function exists for exactly that gap. Full bespoke styling, supplier and venue management, and an on-day crew who handle the build order, the walk-through and the placement your delegated friend was dreading. For couples planning a larger celebration or a destination wedding in the Western Cape, that on-day management is usually what separates a beautiful morning from a frantic one. If your plan is trending toward “too big to DIY alone,” visit our wedding planning page and request a consultation to talk through what a hybrid approach could look like for your date.
Sources
The Bespoke Bride DIY décor guide covers build steps and cost comparisons in detail. Pix Wedding’s budget breakdown offers verified DIY versus hired cost ranges. Paperlust’s reception decor guide ranks visual-impact priorities like lighting and florals.
- DIY Wedding Decor Ideas: The Ultimate Guide | Bespoke Bride
- DIY Wedding Decorations on a Budget (2026): All Areas Guide | Pix Wedding
- Wedding reception decoration ideas | Paperlust